Home Assistant and MQTT
HyperLED talks to your smart home over MQTT. With Home Assistant this is almost automatic: HyperLED announces itself, and all lights and settings appear on their own ("autodiscovery"). It also works with ioBroker, Node-RED and other systems that speak MQTT.
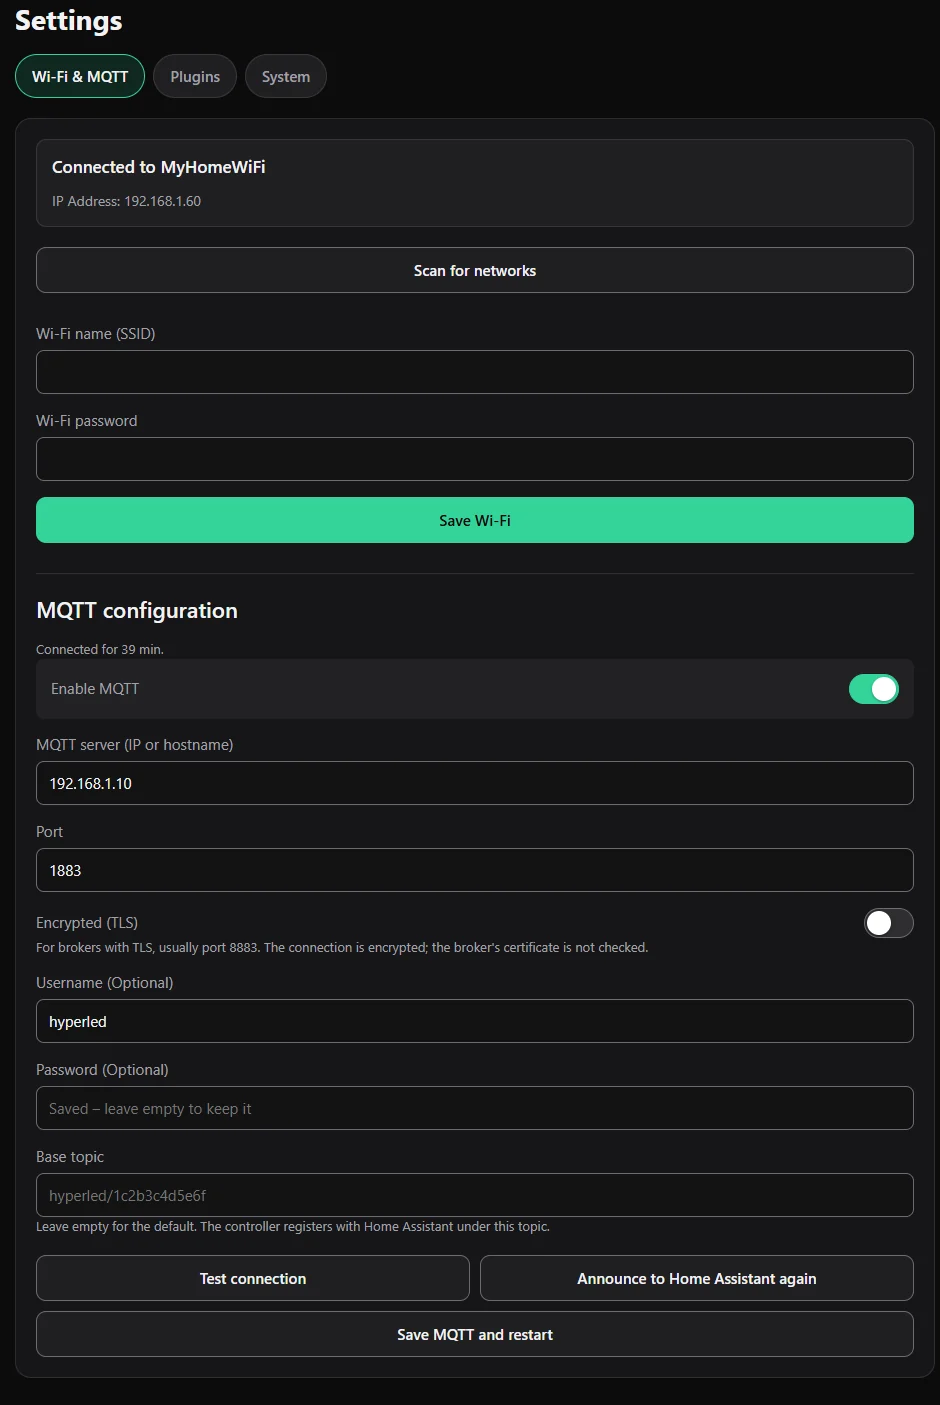
Connect HyperLED to Home Assistant (step by step)
- Set up a broker. In Home Assistant install and start the Mosquitto broker add-on (Settings → Add-ons → Add-on Store). Home Assistant then suggests the MQTT integration; confirm it.
- Create a user for HyperLED under Settings → People → Users, for example
hyperled. Mosquitto accepts Home Assistant users as MQTT logins. - Enter the data in HyperLED. Open Settings → Wi-Fi & MQTT and scroll to MQTT configuration:
- Switch Enable MQTT on.
- MQTT server: the IP address of your Home Assistant (or the broker).
- Port:
1883(normally8883with TLS). - Encrypted (TLS): only if your broker offers TLS. The connection is then encrypted; HyperLED does not check the broker's certificate (home brokers mostly use their own).
- Username / Password: the user from step 2. The web interface never shows the saved password again; leave the field empty to keep it.
- Base topic: leave it empty for the default
hyperled/<MAC address>. If you have several controllers, give each its own topic, for examplelivingroom/hyperled. - Press Test connection. It tries the values without saving. When it works, press Save MQTT and restart.
- After a few seconds the device HyperLED-xxxxxx appears in Home Assistant under Settings → Devices & Services → MQTT.
Above the fields you see whether HyperLED is connected, and if not, why (for example "wrong user name or password" or "broker unreachable"). Announce to Home Assistant again sends everything once more if something is missing.
What appears in Home Assistant
- A light for each segment, including segments on Slaves. The colour controls fit your LEDs: RGB, RGBW, colour temperature, brightness only, or just on/off.
- Effects with the same names as in the web interface.
- All segments: a light that switches and dims everything together (if you have more than one segment).
- Per segment: speed, intensity (in %), palette, and for panels the background effect.
- Texts: every text and scrolling-text element of a panel is a text entity. An automation can write "washing machine done" on the panel.
- Scene, playlist and sync as selection and switches.
- Buttons: every enabled hardware button as an event (see Buttons and switches).
- Diagnostics: Wi-Fi signal, free memory, IP address, start time, the number and time of Wi-Fi failures, and for each Slave whether it is connected and which firmware it runs.
- Firmware: shows when a new version is out and installs it at the press of a button (scenes, schedules and images are kept). Plus a restart button.
- Availability: when the controller is off or unreachable, Home Assistant shows its lights as unavailable.
Every change, from the web interface, a button, a schedule or a scene, reaches Home Assistant right away. New, renamed or deleted segments are picked up by themselves. If you switch MQTT off, the lights are removed from Home Assistant instead of staying behind as "unavailable".
An automation example
Show a text on a panel when the washing machine is finished:
action: text.set_value
target:
  entity_id: text.hyperled_xxxxxx_panel_lauftext
data:
  value: "Washing machine done"
Home Assistant shows the exact entity name with each text element. For a notification when the radio link failed, use the WLAN-Ausfälle sensor (it counts up).
For other smart home systems
Commands are JSON messages to <base topic>/ha/set (all segments) or <base topic>/seg<N>/ha/set (segment N), for example {"state": "ON", "brightness": 255}. HyperLED reports its state on the same paths ending in /ha/state and its availability on <base topic>/status (online / offline).
Without a smart home
MQTT is optional. HyperLED works fully without it.