Several devices (Master and Slaves)
One ESP32 can drive a lot of LEDs, but sometimes you want more: a second strip in another room, an LED panel, or a long wall installation. HyperLED lets you connect several boards and control them all from one web interface.
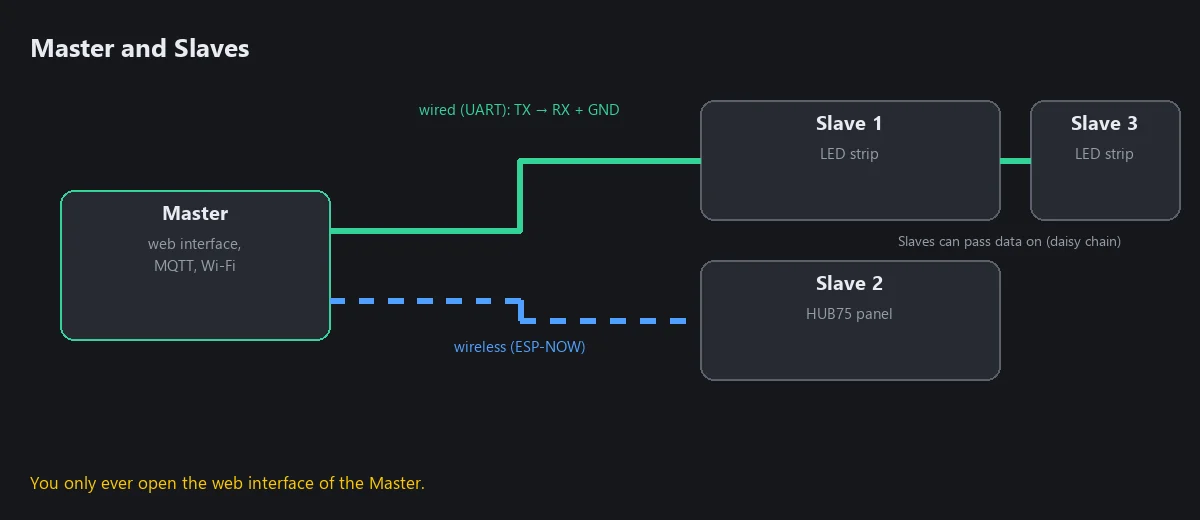
- The Master is the board you normally open in the browser. It knows all segments and tells each Slave what to show.
- A Slave is another board running the HyperLED Slave firmware. It has no web interface of its own. You name and set it up from the Master.
The connection between them is called HyperBus. It works in two ways, and a Slave picks the right one on its own:
| Wired (UART) | Wireless (ESP-NOW) | |
|---|---|---|
| How | a data wire plus a common ground | radio, no wire |
| Pro | the most reliable and fastest | no wiring at all, power only |
| Wiring | Master TX = GPIO 17 → Slave RX = GPIO 16, plus GND to GND. An ESP32-C6 Slave is wired straight: Master TX GPIO 17 → C6 GPIO 17 (RX), Master RX GPIO 16 ← C6 GPIO 16 (TX) | none |
Slaves with a wired connection can pass the data on to further Slaves (a chain). On start, a Slave checks whether a cable is connected; if not, it uses the radio. It remembers its choice.
The radio link needs no setup: Slaves find the Wi-Fi channel of the Master automatically. Because of this the Master and its Slaves always work on the channel of your home network.
The Master computes only what a Slave cannot do itself. Normally the Slave runs the animation on its own and only receives the settings (effect, colour, brightness, speed) when something changes. This keeps the radio free and the effects smooth.
Set up a Slave
- Flash the Slave firmware onto the second ESP32-S3. It lives in its own repository: HyperLED-Slave. Open it in VS Code with PlatformIO and upload it like the firmware in Install the firmware (step 1; the Slave needs no web interface).
- Connect the LEDs to the Slave as in Wiring and power, or the HUB75 panel with its fixed pinout.
- Connect the Slave to the Master: wire TX/RX/GND for the wired mode, or just power the Slave for the wireless mode.
- In the Master's web interface open Devices → Connected devices. New Slaves show up by themselves (press Search for devices if you do not see one yet).
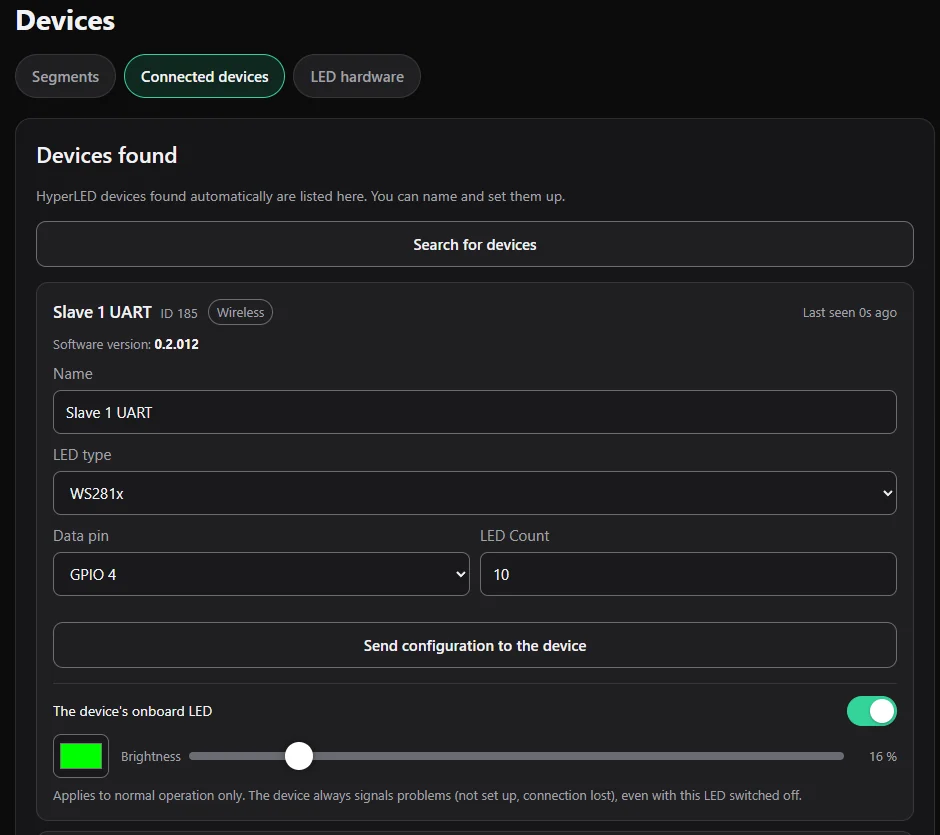
- For every Slave set: - a Name, - the LED type (for a panel choose HUB75), - Data pin and LED Count for strips, or Width, Height and Driver chip for a HUB75 panel,
then press Send configuration to the device. 6. Open Devices → Segments and create a segment with Target Device set to the Slave (see Effects, colours and segments).
From then on, the Slave's segment appears on the Light page and works like any other segment.
Each device card also shows the software version and when the device was last seen, and has a setting for the board's small onboard LED (colour, brightness). The device always signals problems with it, even when you switch it off.
Keeping Slaves up to date
Under Settings → System → Device firmware press Update devices now. Every connected Slave then joins your Wi-Fi briefly and installs the latest firmware. See Updates, backup and reset.
Slaves in Home Assistant
Home Assistant shows for each Slave whether it is connected and which firmware it runs; see Home Assistant and MQTT.
Tips
- One power supply per strip or panel. Always connect the grounds of power supplies that belong together.
- For many LEDs per board, think about the power: each Slave has its own limit, see First light. If a Slave's LEDs run from the Master's supply, switch on Draws power from this device in the segment.
- Slaves with older firmware keep working. They receive pixels from the Master for things they cannot do themselves.
- Plugin scripts (Lua) can run on a Slave too, with Slave firmware 0.3.000 and later (0.3.001 for plugins with many settings, like the Klipper status display); see Plugins.