Effects, colours and segments
This page covers everything you do on the Light page: choosing effects and colours, and splitting your LEDs into segments.
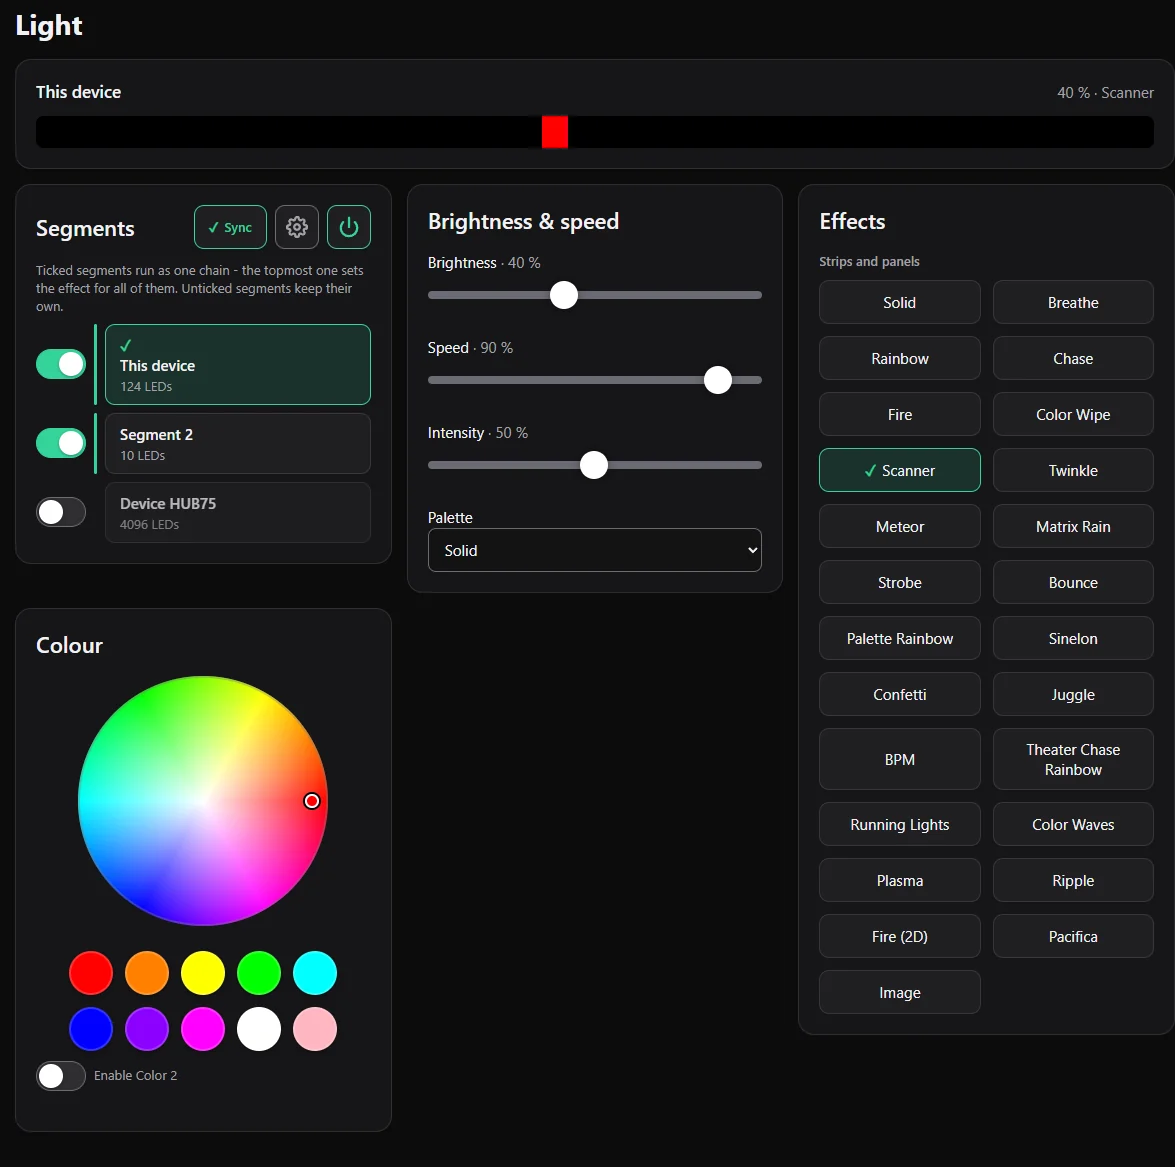
Brightness, speed and intensity
Three sliders under Brightness & speed:
- Brightness: how bright the selected segment is. The sliders act exactly as labelled; nothing else changes them behind your back.
- Speed: how fast the effect moves.
- Intensity: an extra setting whose meaning depends on the effect (for example how dense sparkles or fire are).
Below them, the Palette list changes the colours of palette-based effects. There are five: Solid (your chosen colour), Rainbow, Fire, Ocean and Forest.
Colour
- The colour wheel picks the main colour. Drag on the wheel to choose hue and saturation.
- The round quick colours below it set common colours with one tap.
- Enable Color 2 adds a second colour. Effects that use two colours show it, for example as a background.
Effects
Tap an effect to apply it to the selected segment. Some effects use your colour, others bring their own colours.
| Effect | What it looks like |
|---|---|
| Solid | one steady colour |
| Breathe | the colour slowly fades in and out |
| Rainbow | colours flow along the strip |
| Chase | a light chases along the strip |
| Fire | flickering flames |
| Color Wipe | the strip fills with colour, then empties |
| Scanner | a light sweeps back and forth (like a knight-rider light) |
| Twinkle | random sparkling lights |
| Meteor | a comet with a fading tail |
| Matrix Rain | green "digital rain" |
| Strobe | fast flashing |
| Bounce | a light bounces from end to end |
| Palette Rainbow | a flowing rainbow made from the selected palette |
| Sinelon | a dot that swings smoothly with a trail |
| Confetti | random coloured flecks that fade |
| Juggle | several dots weave through each other |
| BPM | pulsing stripes in the rhythm of a beat |
| Theater Chase Rainbow | marquee-style chasing lights in rainbow colours |
| Running Lights | waves of light running along |
| Color Waves | slow waves of changing colours |
| Plasma | smoothly morphing plasma colours |
| Ripple | rings that spread out like water ripples |
| Fire (2D) | fire for matrices and panels |
| Pacifica | calm ocean waves in blue and green |
| Image | shows a picture (from the pixel art editor) on a matrix |
| Fireworks, Starfield, Bouncing Balls | extra effects for HUB75 panels |
| Clock / Text | for panels: shows the elements (clock, text, weather ...), see Panels and elements |
Fire (2D), Plasma, Ripple and Image are made for matrices but also run on a strip. Fireworks, Starfield, Bouncing Balls and Clock / Text are only offered when the selected segment is a HUB75 panel.
Segments
A segment is a part of your LEDs that has its own effect, colour, speed and brightness. With segments you can, for example, light a desk strip blue while the shelf above runs a rainbow.
At the start you have one segment that contains all LEDs. Segments can also live on other devices (Slaves, see Several devices).
Create and change segments
Open Devices → Segments (or tap the gear next to Segments on the Light page).
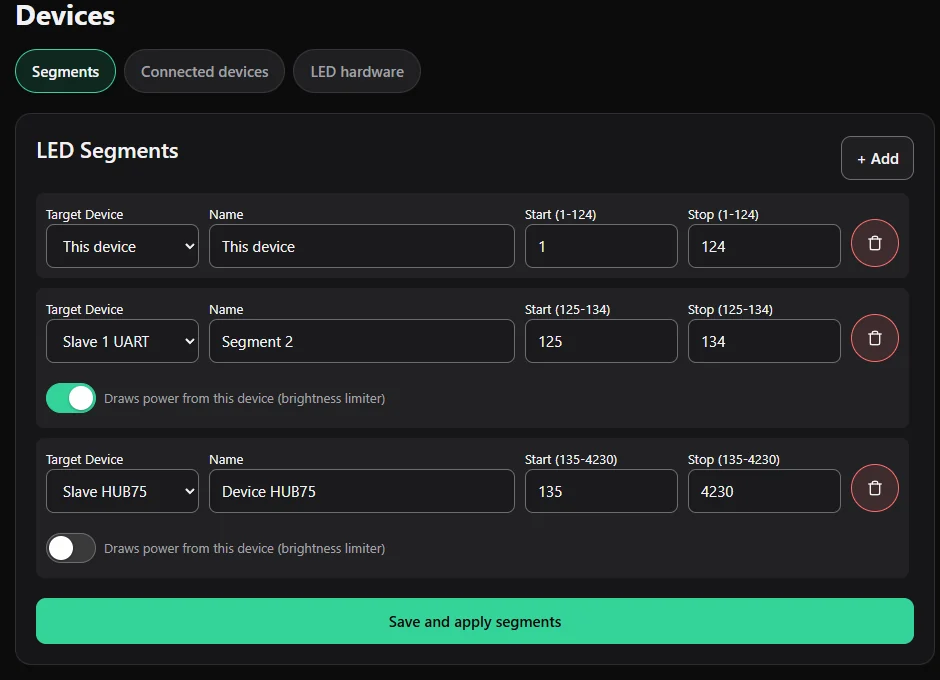
For every segment you set:
| Field | Meaning |
|---|---|
| Target Device | Which device the segment runs on: This device or a Slave. |
| Name | Any name you like. |
| Start / Stop | The first and last LED of the segment. The numbering is continuous over all devices: if this device has 124 LEDs, a Slave's first LED is number 125. |
| Draws power from this device | Only for segments on a Slave. Switch it on if the Slave's LEDs are powered from this device's power supply, so the brightness limiter counts them. |
| Slave current limit (mA) | Only for segments on a Slave that has a power supply of its own (the box above is off). Enter how much current that supply can deliver, and the brightness is lowered before it is exceeded; 0 means no limit. If a Slave has several segments they count together, against the smallest value. |
Use + Add for a new segment and the bin icon to delete one. Press Save and apply segments to apply your changes.
You can also drag segments in the list on the Light page to change their order; this is saved immediately.
Selecting, switching, brightness
- Tap a segment on the Light page to select it. All sliders, colours and effects below then change this segment.
- The power button next to the gear switches the selected segment on or off. The big power button at the top right switches all segments.
Sync: one effect over several segments
Switch Sync on to make several segments behave like one long strip. Tick the segments that should take part (a checkbox appears in front of each one, and a bar marks the group). The effect of the topmost ticked segment then runs across all ticked segments as one chain. Unticked segments keep their own effect, even while Sync is on.
This is handy when your strip is cut into pieces and sits around a room: set one effect and it flows smoothly through all of them.
Plugins and brightness
If a plugin draws on a segment (for example a status display), the Light page says so at the top. The plugin only lays itself over the segment; your own settings are not touched. See Plugins.